
ALM Inventory Manager datasheet
ALM Inventory Manager datasheet
ALM Inventory Manager
ALM Inventory Manager (ALM-IM) is a server-based application which periodically scans selected switches in the network. The mapping file ALM-IM creates during this process is dynamically built and it maintains the relationship between one Cisco IP Phone and the attached computer, laptop or thin-client.
This mapping-file is used by the ALM PRO clients to relate the associated Cisco IP Phone to the connected computer, laptop or thin-client.
ALM-IM may be required in the following setups:
- VDI, CITRIX, Container Based Virtualizations (CBV) or Remote Desktop Services (RDS)
- No direct LAN connection between computer and IP Phone
- Minimize IP Phone detection time
Because ALM-IM provides an instant relationship between a Cisco IP Phone and the attached computer it can decrease detection time to 0 seconds and instantly login the user to the Cisco IP Phone via the Cisco ExtensionMobility Services.
ALM-IM Requirements
> Hardware requirements
- A bare metal server or VMWare ESXi or Microsoft Hyper-v hypervisor with:
- CPU i3 or higher
- Memory min. 4 GB
- Free diskspace > 100 MB
- 100Mb LAN, preferable 1Gb connection
> Software requirements
- Windows Server 2008 or newer
- IIS server with virtual folder
- ALM PRO configured with mapping-file setup
> Switch requirements
- Cisco switch must be running IOS version 12.2 or newer
- HP switch must be running software release S.15 of newer (Procurve series) *
- Telnet from ALM-IM to switch on port 23 (for non-secure setup)
- SSH from ALM-IM to switch on port 22 (for secure setup)
- Read-only access for the command(s):
- ‘show mac address-table’
- Per switch it will take approx. 22 seconds to retrieve the required details and process the information. The speed depends on various factors like the amount of ports and network throughput
- For other switch brands please contact support@rsconnect.net
* please contact support@rsconnect.net for instructions on how to enable HP switch support!
> Supported Cisco IP Phone models
- Any Cisco IP Phone supporting Extension Mobility
> Please make sure you that:
- ALM-IM can access all configured and required switches in the network
- The mapping-file is stored on a network location ALM PRO can access
- ALM-IM can read/write the mapping-file
ALM-IM Overview
The image below shows a high-level overview of the connections within an ALM-IM deployment.
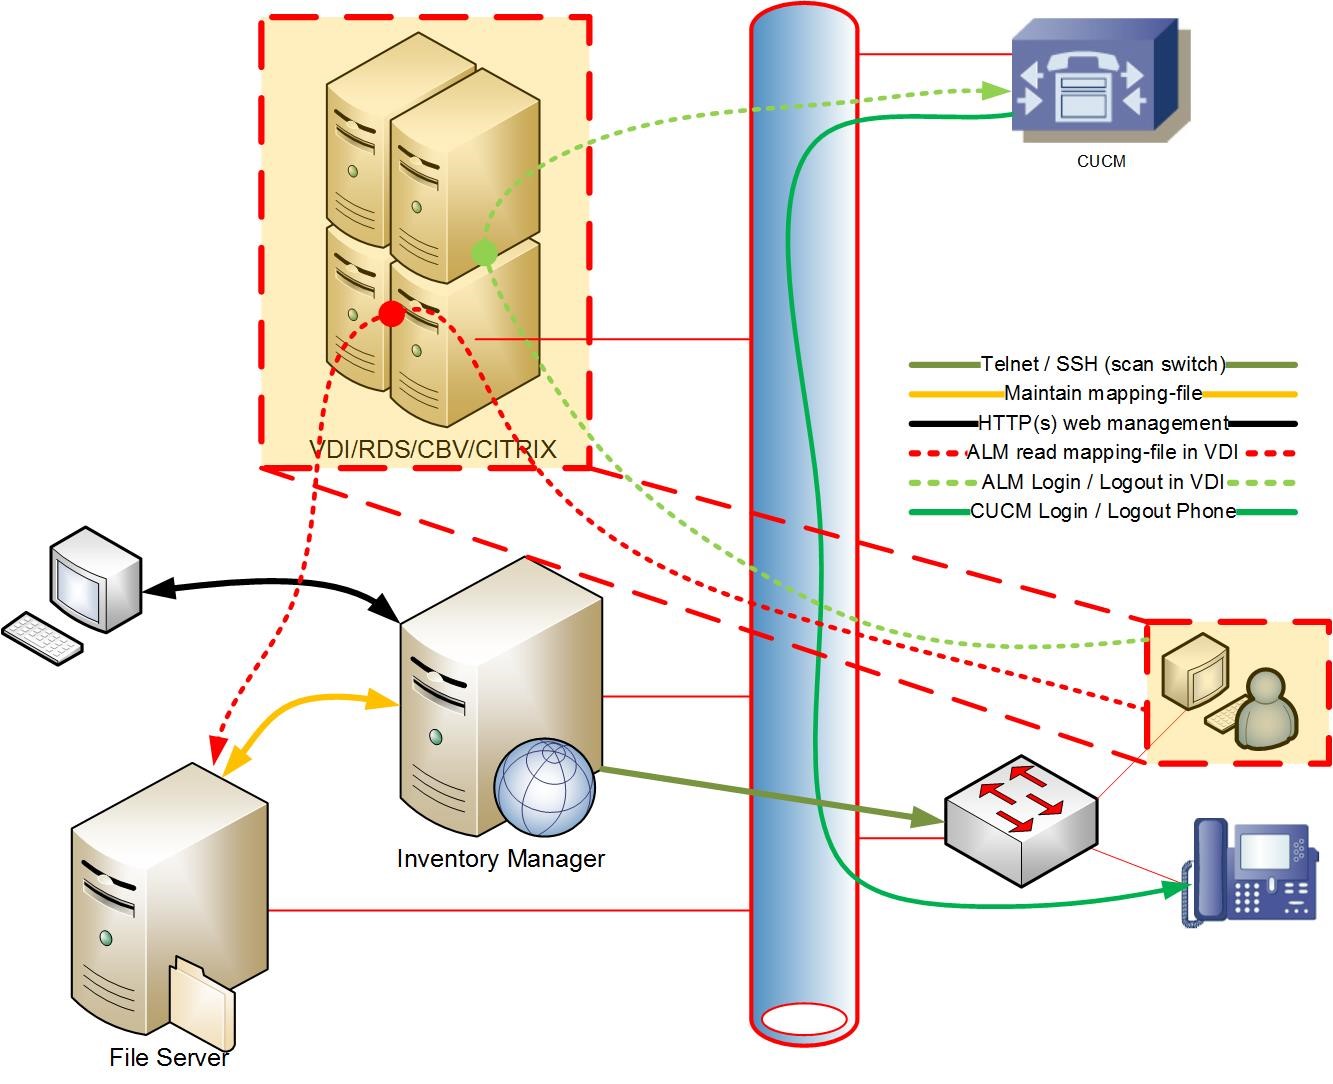
The ALM PRO application runs within the Virtual Environment (VE). When a user logs into a VE session, ALM PRO is started, reads the mapping-file from the file-server and sends the login request to the CUCM ExtensionMobility Service.
ALM-IM scans the configured switches periodically depending on the configuration.
ALM-IM Installation
The ALM-IM software can be remotely deployed by one of our installation experts. The installation covers several steps and should not take more than 30 minutes.
Before the installation can take place a physical or virtual server must be present and prepared with an Operating System according to the specification provided in a previous chapter.
ALM-IM Configuration
When the installation has been completed the following window will appear on the desktop after starting ALM-IM.
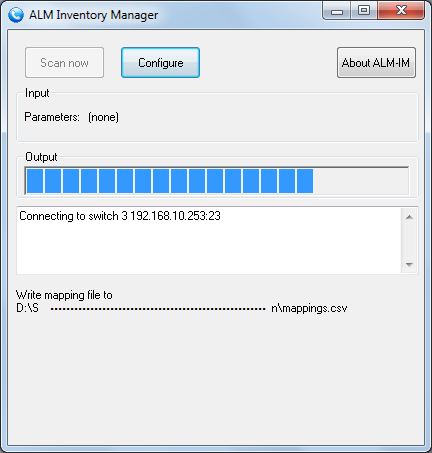
> Scan now
To start scanning the network, the configured switches, press the scan now button. This will start the scanning process of the configured switches and it starts building the mapping file.
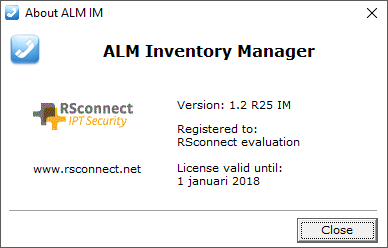
> About ALM-IM
This will show the ALM-IM about box providing license information.
> Input
The input section provides an overview of the parameters ALM-IM uses when running. The parameters are coming from the Windows Task Scheduler which is being used to run the ALM-IM scanning process periodically.
> Output
The output section provides an overview of the scanning progress and it will show the highlights and errors encountered during the scanning process. On the main screen the path to the location of the mapping-file is also displayed. ALM-IM will only provide feedback to administrators if the main application is running in the foreground.
> Configure
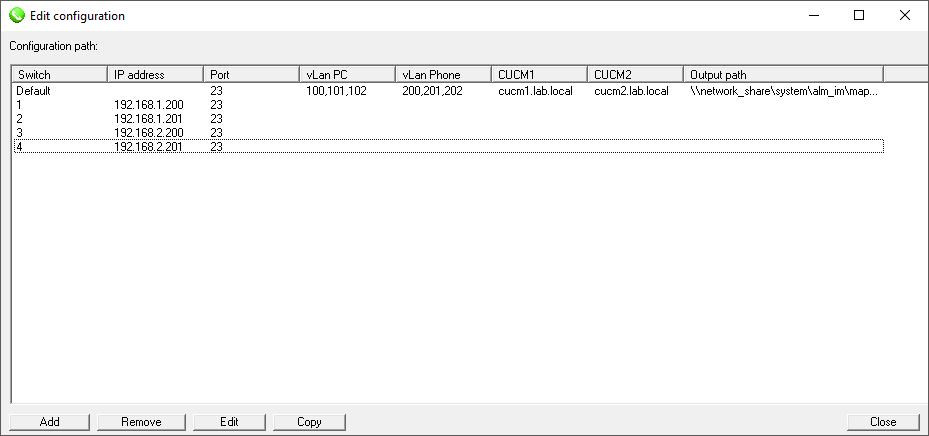
To modify the configuration of ALM-IM and manage the switches to be processed by ALM-IM use the Configure button. This will bring up the screen below.
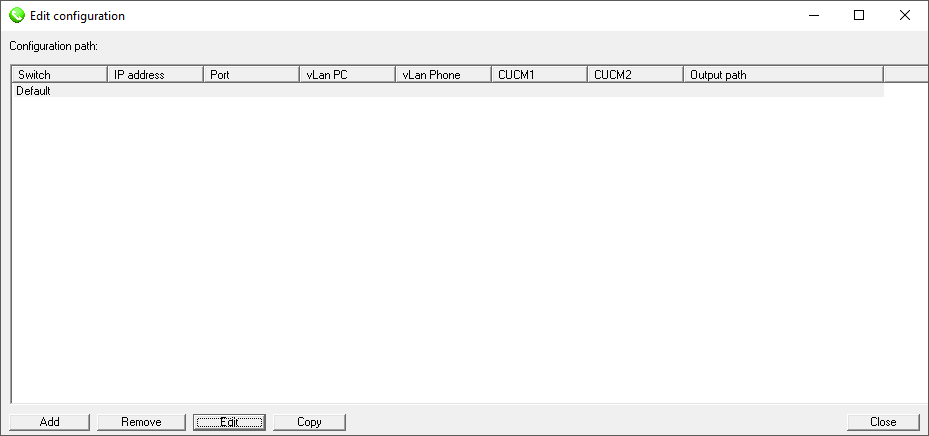
There is always a Default switch present. The Default switch operates as a parent for all other configured switches and contains default settings which ALM-IM will use when these settings are not specifically configured for an individual switch. Basically, it acts as a template.
ALM-IM allows creation of up to 10.000 switches.
The configured switches from the GUI will be saved in the file almim.cfg in the application folder.
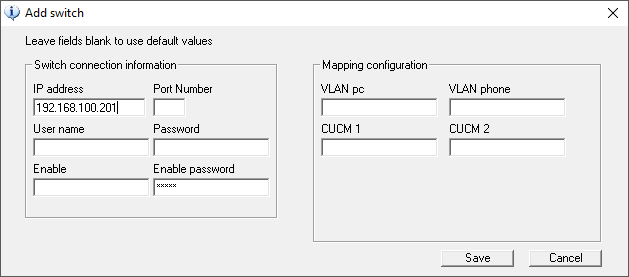
> Add
To add a new switch, use the Add function, this will open a new empty Add Switch window.
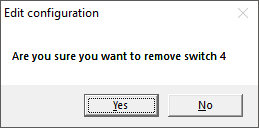
> Remove
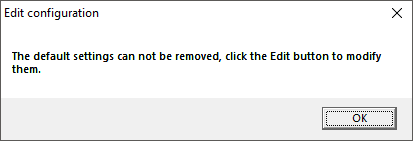
The Default switch cannot be removed, all other individual switches can be removed. There is no undo function.
> Edit
To modify the default settings or an individual switch use the Edit button or double-click on one of the items.
> Copy
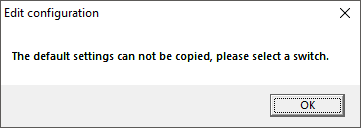
When a switch is configured it can easily be copied to a new switch and allowing to only change settings instead of completing the entire configuration. The Default switch cannot be copied.
> Close
To exit the configuration, use the Close option, all settings or changes will be saved automatically.
Default Settings
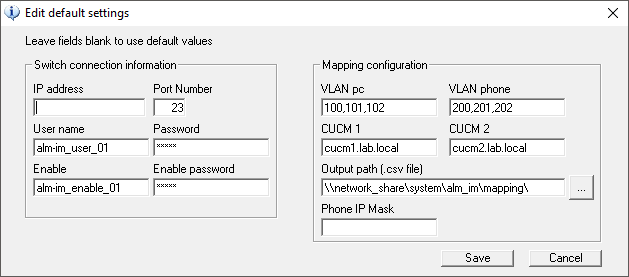
> IP address
Within the Default Settings leave the IP address empty, the IP address of the individual switch will be configured when adding individual switches.
> Port Number
The default port number is 23 (TELNET) and will be used by all configured switches unless configured otherwise per individual switch.
> User name / Password
Configure the user name and/or password for access to the switch. This will be used by all configured switches unless configured otherwise per individual switch.
> Enable / Enable Password
Configure the user name and/or password for ENABLE access to the switch. This will be used by all configured switches unless configured otherwise per individual switch.
> VLAN pc
Add all the VLAN numbers configured on the switch where the client computers reside in. Within the Default Settings template all VLAN id’s can be configured. If specific VLAN’s only exist on specific switches configure the VLAN on the specific switch
> VLAN phone
Add the VLAN numbers configured on the switch where the Cisco IP Phones reside in. Within the Default Settings template all VLAN id’s can be configured. If specific VLAN’s only exist on specific switches configure the VLAN on the specific switch. Separate VLANS with a ‘,’ (comma).
> CUCM 1
Configure the IP address of the CallManager (CUCM) running EM Service.
> CUCM 2
Configure the IP address of the CallManager (CUCM) running EM Service, this is optional.
> Output path (.csv file)
Specify the location of the mapping file, the table containing the relationship between one Cisco IP Phone and the attached computer, laptop or thin-client. This .csv file needs to be accessible from all client computers running ALM PRO. Please refer to chapter ALM PRO Configuration for configuration instructions for ALM PRO.
> Phone IP Mask
Configure a mask or wildcard when generating domain names.
If multiple switches exist within the network, all the switches can be imported into ALM-IM for rapid configuration.
Individual Switch Settings
Within an individual switch, the configured settings will override the settings configured within the Default switch. Preferably only the IP address field will be filled in for an individual switch. Only if required by a specific setup the other field can be configured.
Task Scheduler
ALM-IM needs to be executed using the standard Windows Task Scheduler. Please follow the instructions on one of the following pages to setup the standard Windows Task Scheduler.
https://docs.microsoft.com/en-us/previous-versions/windows/it-pro/windows-server-2008-R2-and-2008/cc748993(v=ws.11)#BKMK_winui
or
http://techgenix.com/working-windows-server-2008-task-scheduler-part1/
ALM-IM Command-line options
ALM -IM can be started using the following command-line options:
|
/SILENT |
do not display user interface, by default user interface is displayed |
|
/TIMEOUT |
switch connection timeout (seconds), default= 30 seconds, skip switch when timeout expires |
|
/LOG |
log file folder location, default = application folder |
|
/RESET |
clear existing mapping file before scanning |
EXAMPLE:
ALMIM.exe [Config path ALMIM.cfg] /SILENT /LOG=[application|localsettings|mydocuments|userprofile] /TIMEOUT=n /RESET
ALM PRO Configuration
For ALM PRO to work with a mapping file set the Detection Method to Linked to mapping file and enter the location to the mappings.csv file which is created by ALM-IM.
ALM-IM License
ALM -IM requires the almim.lic file to be present in the folder where ALM-IM.exe is executed from. The almim.lic file contains the registration details and the validity of the license.