Virtual Desktop Information Administrator Manual
Virtual Desktop Information Administrator Manual
ALM solution in virtual environments
ALM – the single sign-on solution – has two modes of operations.
- When ALM is installed at a Desktop PC or laptop connected to an IP phone.
- When ALM is installed in a virtual environment
such as Windows Remote Desktop (RDS), VDI, CBV Citrix XenApp or XenDesktop or VMWare
This document describes the second situation, for other situations, please refer to the standard
“ALM – Installation and Configuration” manual.
Configuration of fixed phone mappings
For ALM to find the correct phone in a virtual environment, it needs to know which terminal is connected to which phone. In order to facilitate ALM one of the options is to use a mapping file.
A mapping file is a plain text document that lists pairs of thin clients and physically connected phones. An example of a mapping file is listed below:
# mapping file for ALM # use this file to provide a fixed mapping between PC computer name and device IP address # # format: # # PC host name, Cisco IPPhone MAC address, Cisco IPPhone IP address, Cisco IPPhone Directory Number # e.g.: # # mylaptop43, SEP000BFD9088D2, 192.168.0.14, 1831 # # or to auto detect mac address and phone dn, use: # # PC host name,,device IP address # mylaptop43,,192.168.0.141 # or use host name of ip-phone instead of ip-address PC 1212 UK,,SEP000BFD9088D2.company.com |
Now populate this file, either by import it from another system (e.g. export the Extension Mobility profiles from the CallManager using the bulk import/export tool) or use additional tools to automatically create and update this file (see next paragraph).
When done, store this configuration file at a central location which is accessible by all Terminal Servers, e.g. a network share
Configuration of dynamic phone mappings
Depending on your network infrastructure, type of terminal clients, permissions and policies, different solutions are available. ALM Inventory Manager can dynamically generate the mapping file, please consult RSconnect for details via support@rsconnect.net.
Deploy and configure ALM
Deploy ALM to all Terminal Servers that will be used by users running ALM. Either manually login to the virtual desktop or run the setup file (When using Windows Vista and above, use right click, run as administrator) or run the unattended setup. See document “ALM installation instruction for scripted roll-outs”.
Then configure ALM to use the mapping file created in the previous chapter.
For individual instances, open ALM and click the Options menu at the top, then select “Admin Settings.”, on the first TAB select “Linked to mapping file” as the Detection method and browse or enter the path to the mapping file in the filed “Location mapping file (.csv)”.
See picture below:
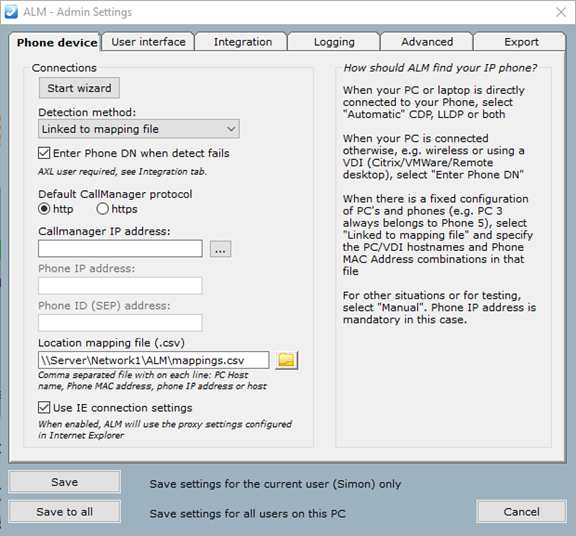 Click Save and Exit ALM.
To automate the deployment of these settings to all clients in the organization, create the settings once, then export the registry key HKEY_CURRENT_USER\Software\Alm and deploy this export file (e.g. using the login script of each user) together with the deployment of the ALM client software. Depending on your organization’s software deployment tools, several options exist to facilitate, please consult RSconnect for support on this topic.
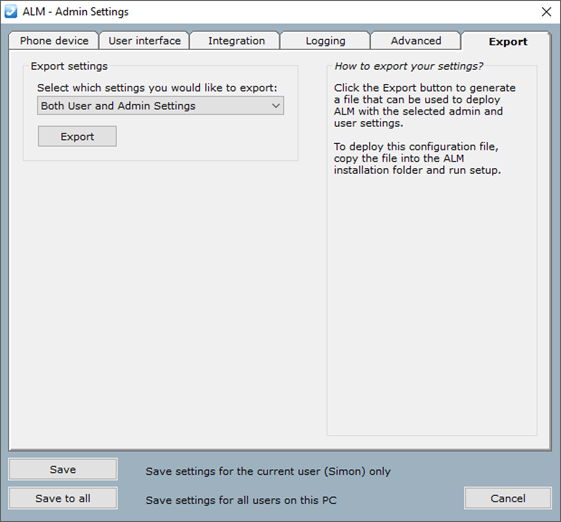
Optionally the settings can be exported using the Export function on the Export TAB within the Admin Settings.
 Additional configuration options
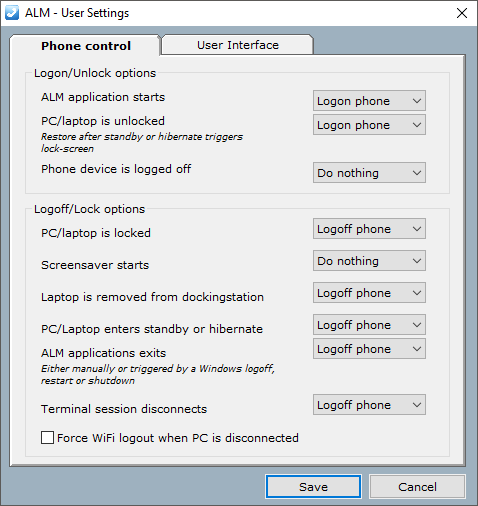
When ALM is started from a Terminal Server environment, by default it has the option “Log off when terminal session disconnects” ticked. When a user closes his terminal client, switches it off or clicks the close button in a remote desktop session, ALM will detect this change and log off the mapped phone for this user. When it’s unchecked, it will only log off the phone when the same user logs in into another terminal client using the same username.
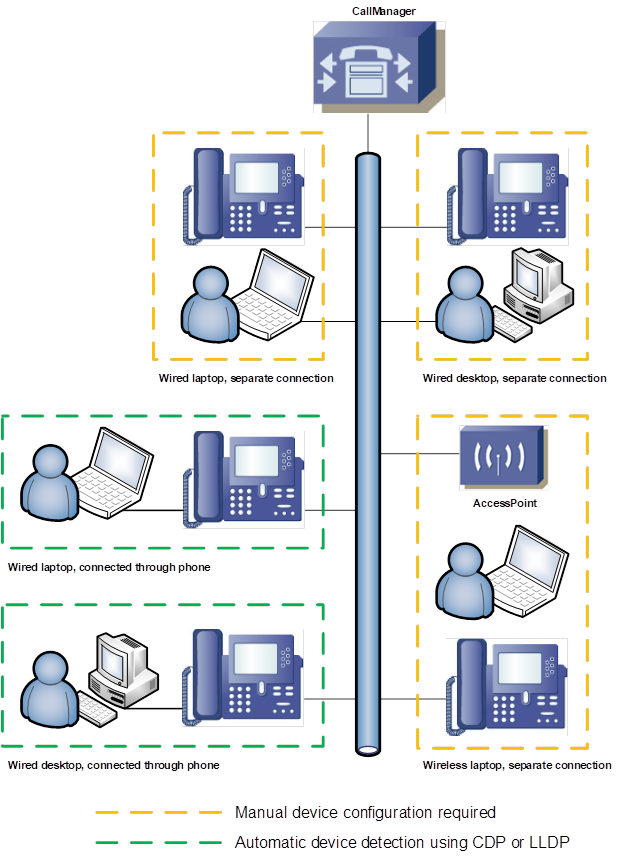
Advanced configuration options for Terminal Clients and wireless IP Phones
> Standard installation
Suitable when the PC or laptop is connected via the phone and running Windows operating system. See page 6, green rectangle areas.
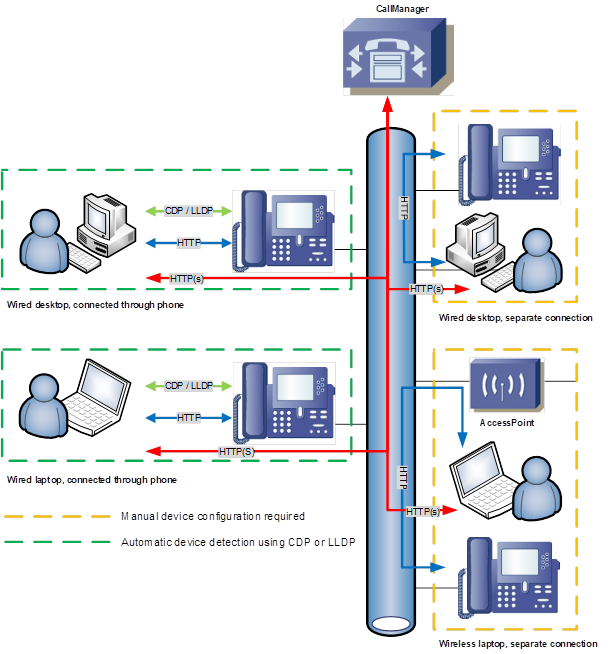
Deploy ALM to the client PC or laptop, either manually or using the unattended setup script included. ALM will detect the connected phones by using CDP or LLDP protocols (configurable) and communicate to the CallManager using HTTP(s), see page 6.
PC or laptop needs a network connection to both the IP phone and the CallManager (direct or via proxy)
> Terminal clients/wireless IP Phones with static configuration
Deploy ALM to the client PC or Terminal server
Configure or import the relationships between terminal clients/desktops and IP phones by adding pairs of ((Computer name or IP address) and (Phone MAC address/Phone host name)).
This file needs to be maintained when configuration changes, e.g. a phone is to be replaced or connected to another PC or terminal client.
-
- For thin-clients store this configuration file at a central location which is accessible by all Terminal Servers, e.g. a network share. Deploy ALM to all Terminal Servers that will be used by users running ALM
- For Windows PCs using a wireless phone, store this configuration file on a central network share and point all ALM clients to the same file
> Terminal clients/wireless IP Phones with dynamic configuration
Deploy ALM to the client PC or Terminal server.
A configuration file is automatically created by an ALM background service (ALM Inventory Manager*1). The ALM-IM application scans IP address ranges of the devices configured in the CallManager. For each phone found, ALM-IM reads the required data from the device including the computer name of the connected pc/client. The computer name will be either configured by the CallManager administrator at the phone configuration page or automatically updated by a CDP/LLDP broadcaster*2 to be installed/deployed at the client terminal.
- For thin-clients store this configuration file at a central location which is accessible by all Terminal Servers, e.g. a network share. Deploy ALM to all Terminal Servers that will be used by users running ALM. As part of the deployment process of new/updated phones the CallManager administrator has to enter the new terminal client computer name in the asset field of the new phone configuration, except when the thin client is configured to broadcast its position using CDP or LLDP protocol
- For fat-clients store this configuration file at a central location which is accessible by all Terminal Servers, e.g. a network share. Deploy ALM to all Terminal Servers that will be used by users running ALM. The CDP/LLDP broadcaster software will automatically refresh the computer name listed in the IP phone and the server scanner software will detect that change and update the central configuration file.
*1 ALM-IM is a an application that needs to be installed at 1 of the terminal servers to be executed at defined time intervals
*2 CDP/LLDP broadcaster is custom software depending on the client operating system and is not suitable in case of wireless IP phones